
Automate importing data from Excel to SharePoint list using Power Automate.
Check out this post on Medium
Have you ever tried copying data from Excel to SharePoint List directly?
I will explain how you can automate the process of copying data from an Excel sheet into SharePoint List using Power Automate. Because, there are some limitations for copying data from Excel to SharePoint list using copy-paste method (ctrl + c and ctrl + v). Below are a few limitations.
Limitations for copying
- SharePoint list columns may have validation rules (e.g., required fields, data types) that can reject pasted data.
- Mismatched data types (e.g., pasting text into a number column) can result in errors. Different date format may cause errors.
- Large datasets may exceed SharePoint’s list size limits or timeout during the paste operation. Copy-pasting does not support datasets exceeding the 5000-item threshold limit.
- Data must align perfectly with the column order in the SharePoint list. Any mismatch can cause incorrect data mapping or errors.
- Hidden or extra columns in Excel may lead to misaligned data.
- There is no built-in error feedback or detailed logs during the copy-paste operation, making it harder to troubleshoot issues.
Now, you may be wondering that we can use SharePoint List’s import options to import data from Excel file. Consider below points about the import options.
When to use SharePoint list’s import options
- For one-time imports or if the Excel data is unlikely to change frequently.
- When dealing with small datasets that don’t require complex logic or automation.
Limitations of SharePoint list import options
- Manual Effort Required: Importing data from Excel to SharePoint using built-in options requires manual effort every time you need to transfer or update data.
- No Automation: You must repeat the import process manually whenever the Excel data changes, which can be time-consuming and error-prone.
- Static Data Handling: The import is a one-time action. Changes made in the Excel file after the import won’t automatically reflect in the SharePoint list.
- No Conditional Logic: SharePoint’s import options don’t allow conditional updates (e.g., skip duplicates, update only certain rows).
When to use Power Automate flow
- For recurring or automated updates.
- If the Excel file structure is complex and requires preprocessing.
- When additional actions, notifications, or integrations are needed as part of the workflow.
Advantages of Using Power Automate
- Automation: Power Automate can run automatically based on triggers (e.g., when a file is updated, or a new file is uploaded), reducing manual work.
- Dynamic Updates: It ensures that the SharePoint list remains in sync with Excel data for recurring changes or periodic updates.
- Error Handling: You can configure error-handling logic to deal with issues during the transfer (e.g., invalid data or connection errors).
- Data Transformation: Power Automate can validate, filter, and transform the data before writing it to the SharePoint list.
- Integration with Workflows: You can include notifications, logging, or additional steps like sending emails or integrating with other systems as part of the data transfer process.
- Flexibility: Power Automate handles complex scenarios, such as: mapping columns differently, adding or updating data conditionally, handling large datasets incrementally.
- Scalability: It’s suitable for workflows that grow in complexity over time, like syncing multiple lists or integrating with external services.
Creating Power Automate Flow
We will use Power Automate to import/copy the data present in Excel file into our SharePoint List by clicking a button, once you create the flow.
For our understanding, I will take a simple example to demonstrate how to create the flow step by step, but it will work for complex examples as well with millions of rows in the excel file.
Prerequisites
- Ensure your Excel file is stored in a location accessible to Power Automate (e.g., OneDrive, SharePoint Document Library).
Imagine you have an Excel file in your OneDrive with this table:
 Table in Excel with name “employees”
- Ensure your SharePoint list is created with the following columns:
- ID (Number)
- Name (Single line of text)
- Email (Single line of text)
- Department (Choice or Single line of text)
- Joining Date (Date)
Step 1: Create a New Flow
- Go to Power Automate
- Click on Create from the left sidebar.
- Select Instant flow.
- Choose Manually trigger a flow (for testing) or Scheduled flow (if you want the flow to run periodically). For this example, we’ll use Instant Flow.
- Give your flow a name (e.g., “Copy Excel Data to SharePoint List”).
Step 2: Set up the Excel Trigger
- Click on New Step.
- Search for Excel and select “List rows present in a table”.
- Choose the location of the Excel file (OneDrive or SharePoint).
- Browse to the file and select the Excel file that contains the “employees” table.
- Select the Table within the Excel file. Ensure your Excel table has column names like ID, Name, Email, Department, and Joining Date
Step 3: Add “Apply to Each” Loop
- After the “List rows present in a table” action, click on Add an action.
- Search for “Apply to each” and select it.
- In the “Apply to each” action, select value from the “List rows present in a table” action. This tells the flow to loop through each row of the Excel table.
Step 4: Set up SharePoint Action Inside the Loop
- Inside the “Apply to each” loop, click on Add an action.
- Search for SharePoint and select “Create item”.
- Choose your SharePoint Site Address and select your List Name.
- Map the Excel table columns to the SharePoint list columns:
- ID: Map the ID column from the Excel file.
- Name: Map the Name column from the Excel file.
- Email: Map the Email column from the Excel file.
- Department: Map the Department column from the Excel file.
- Joining Date: Map the Joining Date column from the Excel file.
Step 5: Save and Test the Flow
- Click Save.
- To test, click on Run to test the flow.
Step 6: Verify in SharePoint
After running the flow, go to your SharePoint list and verify that the data from each row in the Excel table has been copied into separate SharePoint list items.
Key Steps
- Trigger: Manually or Scheduled trigger (depending on how you want the flow to be initiated).
- Action: “List rows present in a table” (retrieves all rows from the Excel table).
- Loop: “Apply to each” (loops through each row of the Excel table).
- Action Inside Loop: “Create item” (creates a new item in SharePoint for each row in the Excel table).
- Map Fields: map the fields from Excel to SharePoint columns.
Optional Steps
- Error Handling: Add “Configure Run After” to handle any failures (e.g., to log errors if the SharePoint list is not accessible).
- Notifications: Add actions like Send an email or Post a message in Teams to notify users when the flow completes or fails.
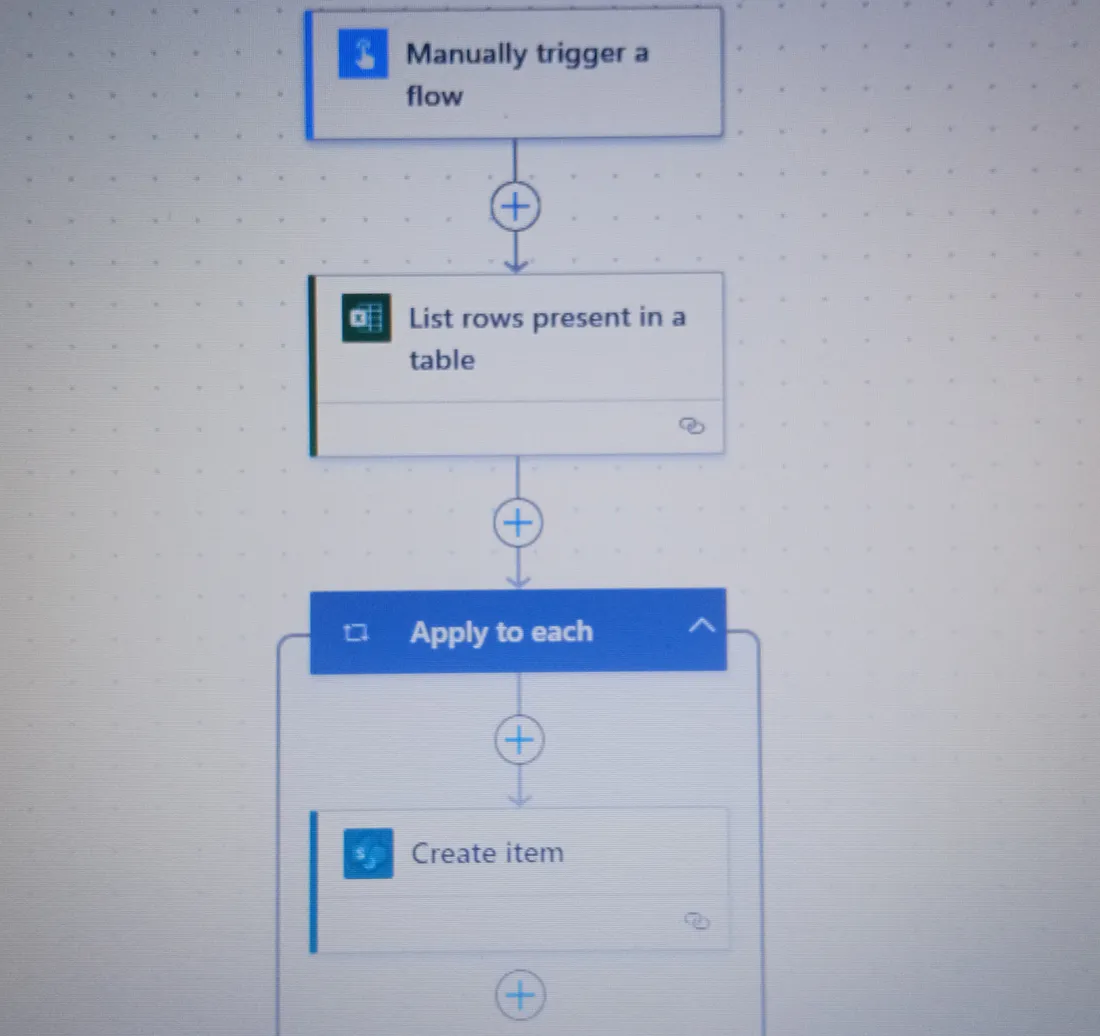 Power Automate Flow to import data from Excel to SharePoint List
Conclusion
We’ve walked through the process of creating a Power Automate flow to transfer multiple rows of data from an Excel file to a SharePoint list.
By using Power Automate, we can:
- Automate the process of copying data from Excel to SharePoint.
- Handle multiple rows efficiently with a loop, ensuring that each row gets copied as a separate item in SharePoint.
- Customize the flow to meet specific needs, like adding error handling, adding notification actions.
This automation eliminates the need for manual imports, saving time and reducing the risk of errors. Whether you’re dealing with periodic updates or ongoing data synchronization, Power Automate is a powerful tool that streamlines the process and integrates seamlessly with both Excel and SharePoint.
Feel free to share your thoughts in the comments!